How to Use a Floating Lid for Fermentation Efficiently?
Fermentation is an ancient practice, essential for crafting flavorful foods and beverages. Using a floating lid for Fermentation with floating lid offers several advantages. It enables better gas exchange while minimizing contamination risks.
This method prevents the growth of harmful bacteria. Furthermore, it helps maintain a stable temperature during fermentation. The floating lid acts as a barrier, reducing exposure to air. For best results, ensure proper sealing of the lid. Small leaks can lead to unwanted results.
Many home brewers and fermenters have experienced failures due to improper techniques. Examining your setup can lead to more efficient fermentation processes. It's crucial to track your progress and make adjustments when needed. This approach can enhance your fermentation experience significantly.
Understanding the Concept of Floating Lids in Fermentation
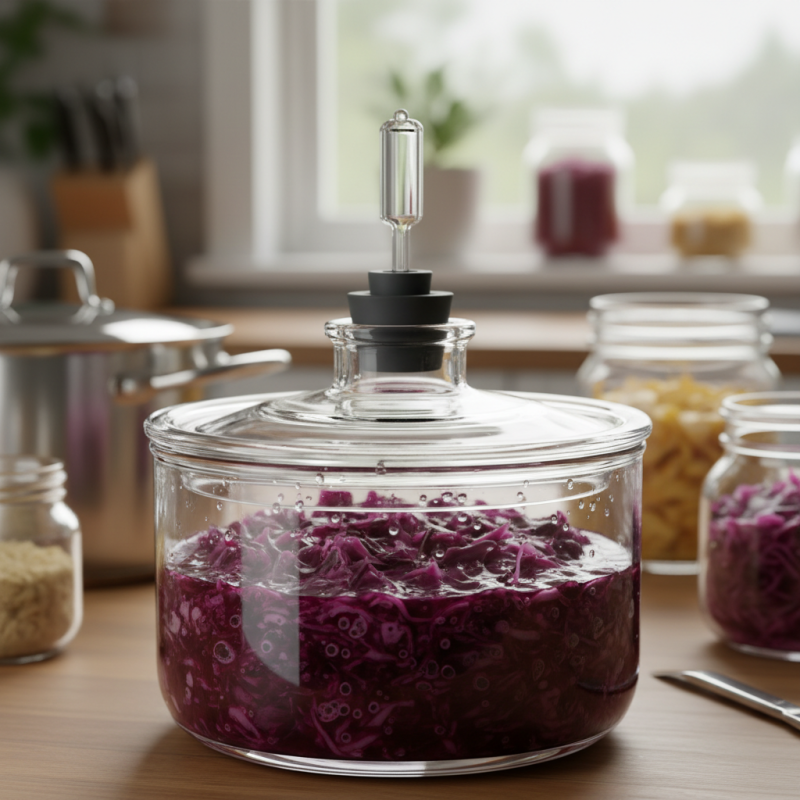
Floating lids are a fascinating tool in the world of fermentation. They provide a simple yet effective way to manage gas release during the process. The design allows carbon dioxide to escape without permitting contaminants to enter. This tight control can lead to better fermentation outcomes, reducing the risk of spoilage.
When we think about using a floating lid, we should understand its mechanics. The lid typically sits above the liquid, buoyed by the contents below. This creates a seal that helps maintain anaerobic conditions. However, not all setups are foolproof. Factors like temperature fluctuations can affect the seal, leading to potential issues. Thus, regular monitoring is vital.
Experimentation is crucial in fermentation. A floating lid might work perfectly for one mixture but fail for another. Understanding your specific fermentation process can lead to better results. Each batch can offer new lessons. Embrace the imperfections and adapt. It’s all part of the journey in mastering fermentation with floating lids.
Effectiveness of Different Fermentation Methods Using Floating Lids
Selecting the Right Fermentation Vessel for Floating Lids
Selecting the right fermentation vessel is crucial for using floating lids efficiently. Glass, plastic, and stainless steel are common choices. Glass and stainless steel offer durability and resistance to contamination. Plastic is more lightweight and affordable but can absorb odors. Each material has its pros and cons, affecting your fermentation outcome.
Your vessel’s size and shape matter too. A wider vessel promotes better gas exchange during fermentation. However, it can also increase the risk of contamination. Ensure the vessel has a snug fit for the floating lid. A tight seal prevents outside air while allowing gases to escape. Test various vessels to find what works best for your specific fermentation project.
Don’t overlook cleanliness. Even minor contaminants can ruin your batch. Before starting, sanitize your vessel thoroughly. Pay attention to small imperfections in your vessel. They might harbor bacteria or mold. Regularly inspect the floating lid for wear. Remember, fermentation is a process of trial and error. Learn from each batch to improve your technique.
Step-by-Step Guide to Setting Up a Floating Lid System
Setting up a floating lid system for fermentation can enhance your brewing experience. A floating lid helps manage CO2 release while preventing unwanted contaminants. Begin with a suitable fermentation vessel that has an opening large enough to accommodate the lid.
Choose a lid that can float freely on the liquid surface. This allows displacement as gases build up. You may need to experiment with different weights or materials to achieve the right balance. Pay attention to how the lid interacts with the liquid during fermentation. Small adjustments can make a difference in efficiency.
Monitor the fermentation closely. Sometimes, the lid may not seal properly. This can lead to potential contamination. Observing changes regularly will help you refine your approach. Take notes on the process, as feedback is crucial for improving your technique. Adjustments often require reflection and experimentation. Each attempt brings you closer to mastering the process.
How to Use a Floating Lid for Fermentation Efficiently? - Step-by-Step Guide to Setting Up a Floating Lid System
| Step | Description | Materials Required | Duration |
| 1 | Gather all necessary materials. | Fermentation vessel, floating lid, airlock. | 15 minutes |
| 2 | Sanitize the fermentation vessel and equipment. | Sanitizer solution, cleaning cloth. | 30 minutes |
| 3 | Prepare the fermentation mixture. | Ingredients for fermentation, water. | 1 hour |
| 4 | Add the mixture to the fermentation vessel. | None. | 15 minutes |
| 5 | Install the floating lid onto the vessel. | Floating lid, sealing material. | 10 minutes |
| 6 | Attach the airlock to the lid. | Airlock. | 5 minutes |
| 7 | Store the vessel in a suitable fermentation environment. | Temperature-controlled space. | Ongoing for several days or weeks. |
| 8 | Monitor fermentation activity. | None. | Ongoing throughout fermentation. |
Maintaining Optimal Conditions During Fermentation with a Floating Lid
Fermentation can be a delicate process, and maintaining optimal conditions is crucial for success. A floating lid is a useful tool for this purpose. It helps to manage the fermentation environment effectively. One of the key benefits of using a floating lid is its ability to minimize oxygen exposure. This reduction helps maintain anaerobic conditions, critical for many fermentation processes.
Ideal temperatures are also essential for proper fermentation. With a floating lid, you can easily monitor temperature changes without disturbing the contents. Make sure to check temperatures regularly. A stable environment promotes the growth of healthy microorganisms. However, fluctuations can lead to unwanted byproducts.
Observation is important during fermentation. Sometimes, the lid may not float as expected, and this can indicate issues. If the lid sinks or does not seal properly, it might allow air into the container. Regularly inspect your setup to ensure that it functions as intended. Reflecting on these small details can lead to better results in your fermentation projects.
Troubleshooting Common Issues with Floating Lids in Fermentation
Floating lids can enhance the fermentation process, but issues may arise. A common problem is improper sealing. If the lid does not fit snugly, oxygen can enter. This may lead to unwanted bacterial growth, ruining your batch. A study indicated that oxygen exposure increases spoilage rates by nearly 30%. Ensure the lid creates a tight seal to maintain anaerobic conditions.
Another concern is managing the fermentation temperature. Floating lids can insulate and trap heat. Excessive heat can accelerate fermentation. This may produce off-flavors or unwanted alcohol levels. Research from fermentation science suggests that ideal temperatures for many strains vary between 68°F and 72°F. If your fermentation gets too warm, it’s crucial to monitor and adjust.
Floating lid setups may also trap excess carbon dioxide. This can lead to pressure build-up, causing the lid to dislodge. An uncontrolled escape can create a mess and loss of product. It might take experimentation to find the right balance between pressure and lid security. Pay attention and make adjustments based on your observations. Each batch may offer learning opportunities.